23.2.10

About Pea-Whipped Potatoes

Confession: I have a love-hate relationship with Michael Chiarello. Seriously, I have no idea if I love the guy or I hate him and his oh-isn't-Napa-just-the-end shut-the-fuck-up-already lifestyle. But then I saw him make pea-whipped potatoes on his television program, and I think perhaps beneath his is-he-or-isn't-he? exterior, we might just be kindred spirits. Because I love mashed potatoes. And I love mushy peas*. But to mix mashed potatoes with mushy peas? BRILLIANT!

* We'll actually be doing a mushy pea recipe that is slightly different than what you will be seeing here. Sometime. In the future. Promise.

So here's what we need:
  • 1 Idaho russet potato
  • a little warm milk or cream
  • a little melted butter
  • 1 cup of frozen peas
  • maybe a bit of olive oil
  • salt and pepper to taste
Yeah, now I guess you know what I mean when I say "all measurements are approximate," because I have no idea how much of anything this is going to take. It's all a matter of preference. So just go with it, okay?

POTATOES!

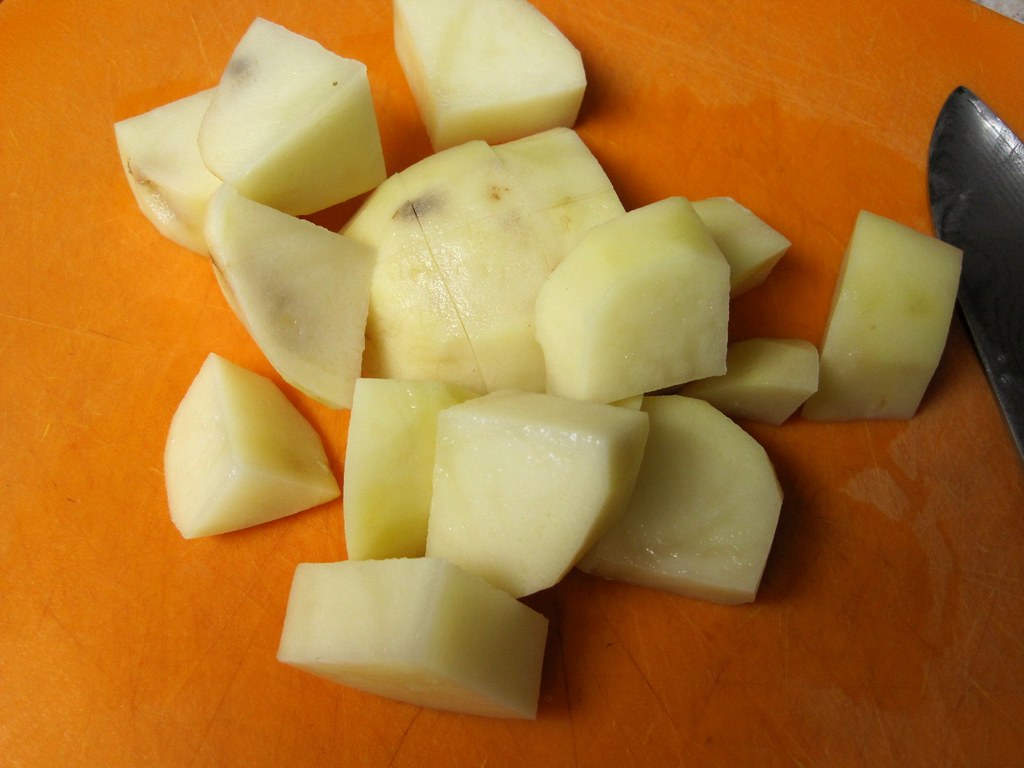
First, peel and dice your potato into about 1-inch cubes.


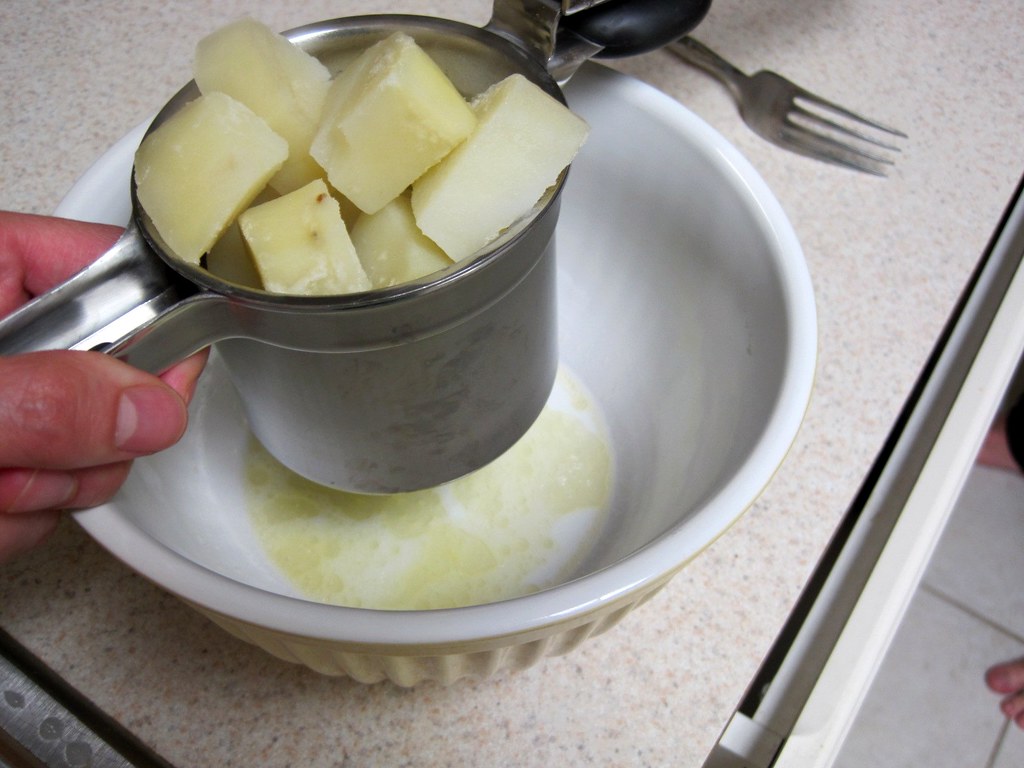
Next put your potatoes in a pot and cover them with cold water. Add salt. Bring the pot to a boil over high heat, then reduce the heat to a gentle rolling boil and let that roll along gently until your potatoes are soft enough to stick a fork in them. But not so soft they are falling apart, because then you'll have some problems with the next part, which is draining the potatoes in a colander. So drain your potatoes in a colander, and if you have a ricer or masher now's the time to get it out.

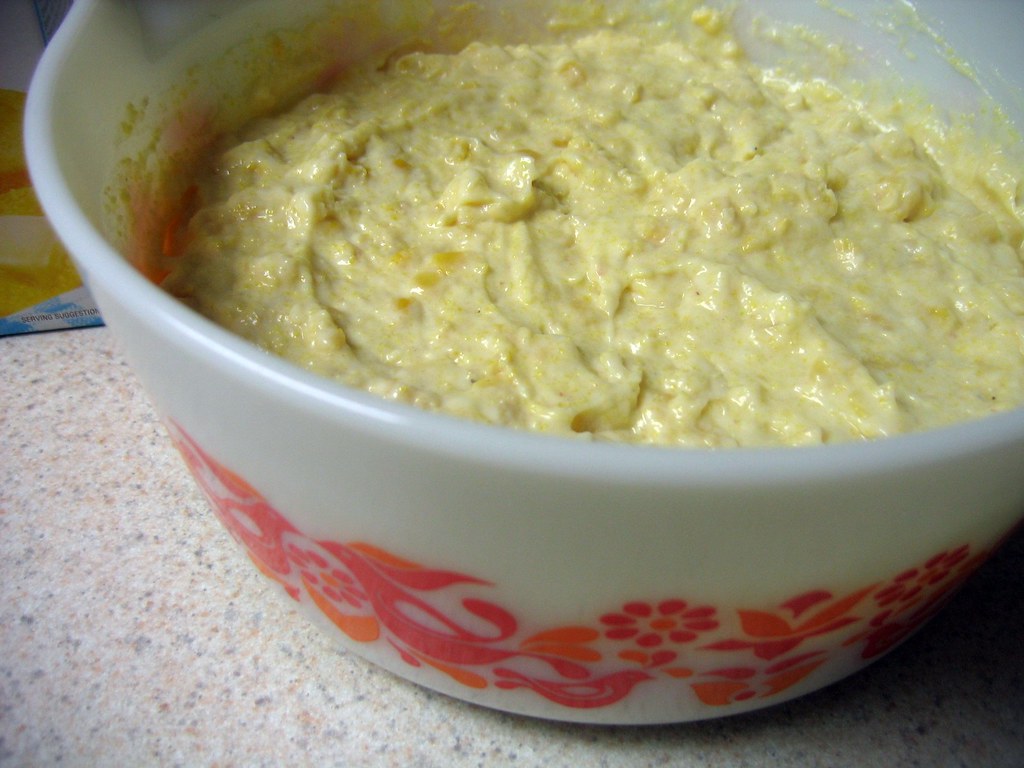
Hopefully while your potatoes were rolling gently you got yourself a bowl and added a little milk and/or cream and/or butter to the bowl. (Start with about 1/4 cup of milk and a tablespoon of butter.) And hopefully you heated that bowl up in the microwave or something until everything got warm. Because you need that now for your potatoes.


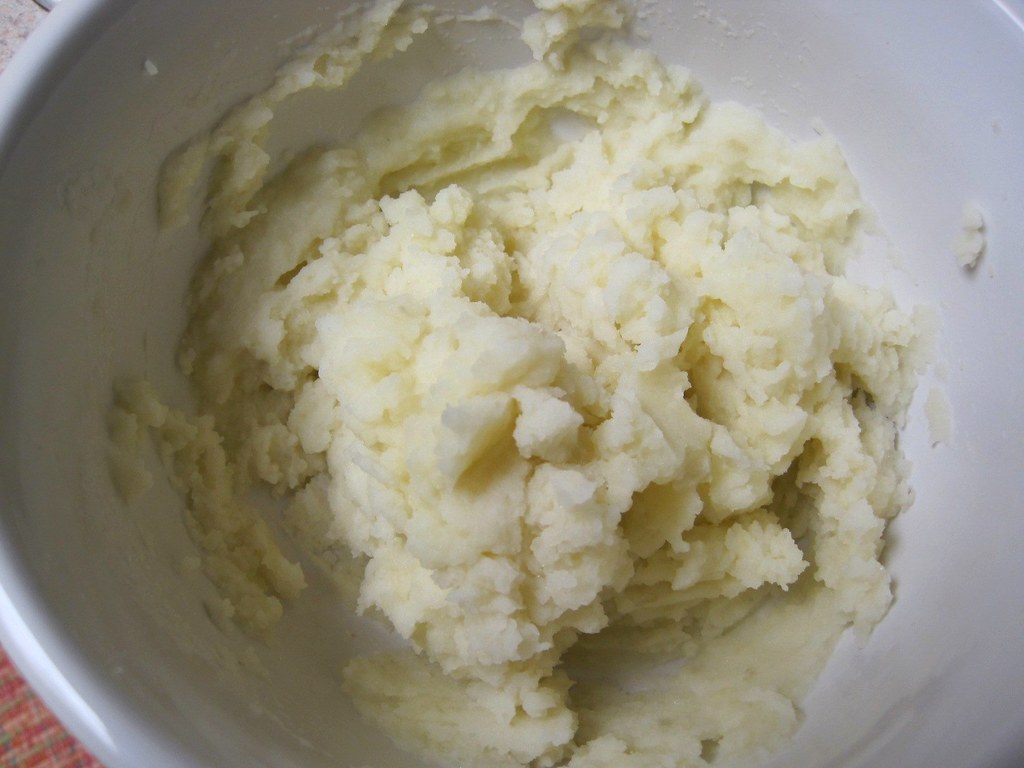
So get your potatoes in the bowl, and mix/mash that all up until it's creamy, and if it's too dry add A LITTLE more milk or cream at a time until you get it to the right consistency. And when I say "little," I MEAN little, because you can always add more if you need it BUT YOU CAN'T TAKE IT BACK OUT AGAIN IF YOU ADD TOO MUCH. The importance of this should be evident by the caps lock, but just in case it isn't, I have added this sentence. To point out the importance of that stuff up there written in all-caps.

Add a little salt and pepper to this and, hey! Look! You made mashed potatoes!


BUT WE'RE NOT DONE!

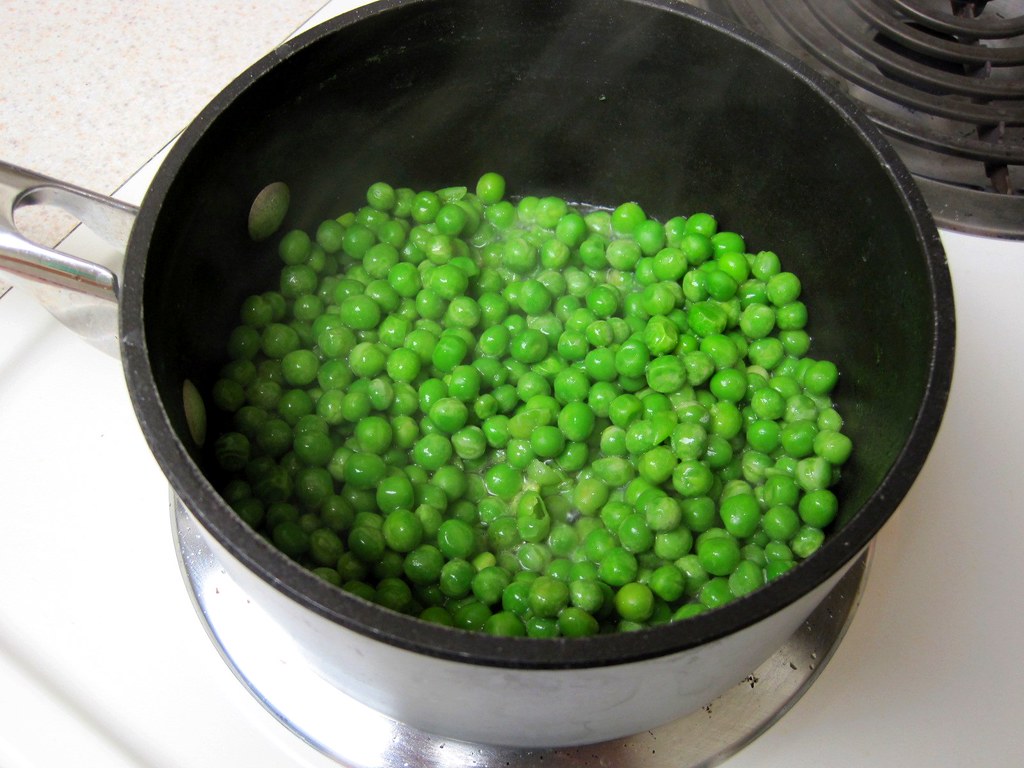
Rinse out the pot you just used to boil up your potatoes in and add your frozen peas. Maybe a little olive oil for extra flavor if you like. Put the lid on that baby and let everything steam over medium-high heat until the peas are tender.


Now put those peas in a food processor with a pat of butter and blend it all up until it's smooth. (A stick blender also works well for this, but I broke mine sometime after my iPod died but before my camera, DVR, and laptop hard drive bit the big one. Apparently there was a month in there when I did nothing but give off electronic-destroying EM radiation. I could have been one of the Watchmen!)


Here's where things get tricky: dump the pea puree into the mashed potatoes and stir it all up until combined.


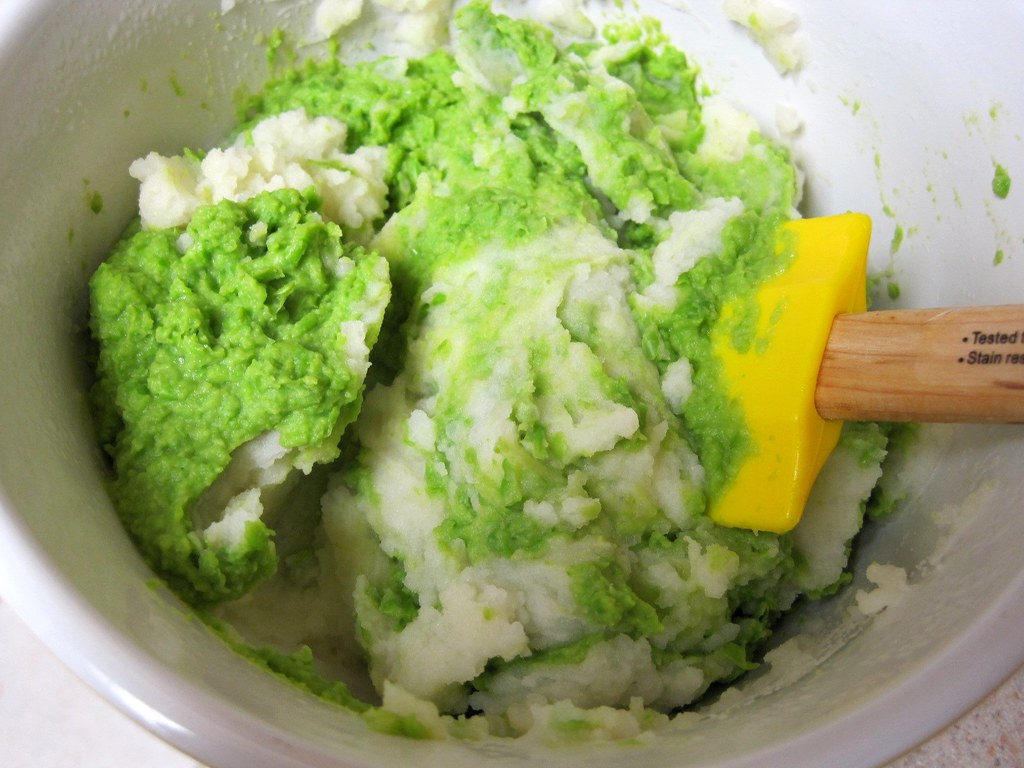
Give it a taste. If it needs more butter, add more butter. If it needs more salt and pepper (which it probably will), add more salt and pepper. Then, serve. And think about Michael Chiarello. Or, you know, don't. I can't help it. I AM OBSESSED.

20.2.10

About Roasted Fennel

Way back when we roasted a whole chicken with root vegetables we threw some fennel in there because (a) I told you to, and (b) fennel is DELICIOUS. But what if you want some delicious fennel but you're not roasting a whole chicken? Like, what if you're grilling up a steak or something and you're thinking to yourself, "Man, some roasted fennel would be SO DELICIOUS with this?" Well fear not, because roasted fennel all by itself is a thing. And I'm gonna show you how it's thung.

For two servings you'll need:
  • 1 large fennel bulb, trimmed and sliced
  • olive oil
  • balsamic vinegar
  • salt and pepper to taste
First off preheat your oven to 400 F.

Now to trim and slice your fennel. Normally when you bring fennel home it looks like this:


Fennel fronds are great. I like to make a bouquet garni with them whenever I make fish soup. They're great in salads. They are not great roasted. So cut off the stalks and trim a bit off the root-end of your bulb.


Next cut the bulb in half. You'll notice the core coming up through the bulb from the root, and while the core keeps your layers of fennel together, it's not exactly edible. I mean, it's not poisonous or nothing, it's just really tough and stringy and NOT delicious. So cut your halves in to quarters, and again into eighths, and then trim out most of the core of each slice with the tip of your knife, leaving just enough to keep your fennel layers together. Like this:


Thankfully, the hard part is over, because all you have to do now is throw those pieces into a bowl, then add a couple glugs of olive oil and balsamic and some salt and pepper.


Coat each piece evenly and lay them out in a single layer on a half-sheet pan.


Stick the pan on the middle rack of your pre-heated oven and let it roast for 20 minutes. When it's done, you're done!

17.2.10

About Roasted Cauliflower

Cooking for boys who claim to hate vegetables is SO WORST. It's like, give me a freaking BREAK already, I'm trying to do something good for your freaking colon so just eat the goddamned cauliflower, you know? But that's the thing about boys; they make no sense.

That's why I hereby give all y'all permission to be SNEAKY.

And that's exactly what roasted cauliflower is. Sneaky. One could even call it CRAFTY. Because roasted cauliflower tastes nothing like cauliflower. It tastes like french fries. But BETTER. Better, better french fries. I LOVE BETTER FRENCH FRIES.

Ahem.

Your shopping list for two is pretty simple. and pretty much consists of the following:
  • 1 head of cauliflower
  • A couple glugs of extra virgin olive oil
  • Salt and pepper
That's it.

Now go and preheat your oven to 425 F. Now unwrap your head of cauliflower and remove any outer leaves, and trim the bottom off the stem to discard any brownish/blackish spots. As soon as you're done with that set your head of cauliflower stem-side down on a cutting board, and marvel at how freakishly brain-like that freaky-deaky vegetable looks. Then pull out your chef's knife and prepare to audition for Shaun of the Dead 2: Cooking Boogaloo.

Slice your brain--I mean cauliflower--into approximately 1/4-inch sections.


Remove these to a large bowl and dump a couple glugs of extra virgin olive oil over them. Then add a few pinches of salt and pepper, and gently toss the slices so they are completely coated but still (for the most part) intact. Spread the cauliflower into a single layer on a half-sheet pan.


Once the oven has preheated, stick the tray in and let it roast for about 20 minutes. Barring any major catastrophes (they have been known to happen) it should look about like this:


Use a spatula to flip the pieces over, then stick them back in the oven for another 20-30 minutes, until they look like this:


(That would be golden, brown, and delicious.) Now pile those on a plate with, what is that? Barbecued chicken and macaroni and cheese?


YES PLEASE.

5.1.10

About Shawarma Chicken

Happy New Year, little chefs! Once again it's time for resolutions, unless you're me of course because I never make resolutions, but I'm trusting that you're not like me because GOOD GOD why would you want that? And I'm trusting that one of your resolutions is probably to eat healthier, and eating healthier probably includes consuming a whole lot of skinless, boneless chicken breasts, and if it does, WHO BOY do I have a tasty one for you.

Today's recipe is inspired by Middle Eastern shawarma, which is like, so good you guys, and so figgin' easy to boot. Pretty much all you need is the marinade and a grill, which is funny because you don't even need a grill when you have a grill pan. Which I do!

So, let's get started. For the marinade, you'll need the following ingredients:
  • 1/2 tsp salt
  • 1 tsp curry powder
  • 1 tsp freshly ground black pepper
  • 5 garlic cloves, minced
  • 1/4 cup olive oil
  • juice of 1 lemon
which you just mix together in a bowl:


Next to prepare your chicken breasts. You'll notice they're pretty lumpy. Well, if there's one thing I can tell you with any amount of certainty, it's that lumpy breasts do not cook up evenly. So you'll want to de-lumpify them by butterflying the thick part and then smashing it all down with a mallet or the bottom of a small pan or something. (But do it between plastic wrap so you don't get chicken goo everywhere.)


Toss your chicken pieces into your bowl of marinade, cover, and refrigerate it for at least a couple of hours, or overnight if you have the luxury of time.


When you're ready to cook, heat up your grill pan over medium-high heat, then toss on your chicken.


Grill each side for 3-4 minutes, depending on how thick your breasts are (heh). You'll know it's done when you poke at it, and it stops being squishy (but before it turns into shoe leather).


When that's all done, remove the chicken to a cutting board and loosely tent it with aluminum foil while it rests for a few minutes. Now, this part is important: when you cut your breasts into slices, you're going to want to cut them AGAINST THE GRAIN. So in this picture, you'll see that the meat fibers are pointing in a sort of north-westerly direction, and I've sliced the breasts perpendicularly to that grain.


This ensures that your chicken strips will be tender and easy to bite through should you choose to stuff them in a pita with some hummus and lettuce and tomato and maybe some feta and onions, or if you'd rather just throw them on top of a salad.


You know, your choice.

6.12.09

About Mulled Wine

Appropriately I am writing this while mildly inebriated, but perhaps mildly inappropriately I am drunk on whiskey. But dude, what can I say, I like whiskey. Oh my God, whatever, etc.

ANYWHO.

This particular recipe is a treasured one in the Team Slommins teamdom, if for no other reason than with every sip it brings us back to that magical land called Brussels, the land of waffle vans and really old walls and obscene statues and ginormous beers, the place we both decided was the most magical and wonderful place on the planet we've ever ever visited, and OH MY GOD CAN I GO BACK YET? (I also wrote about that particular trip here and here and here and here and here and here.)

So yeah. Brussels is awesome. But mulled wine also happens to be awesome IF you don't add a billion pounds of sugar to it. Which pretty much every recipe I've ever encountered does. SO. I bring you mine, which is relatively standard except I don't add 2 cups of sugar or 1 cup of sugar or even 1/2 cup of sugar. In fact, what you'll need is this:


which is this:
  • 3 3-inch sticks of cinnamon, or the number of sticks of cinnamon it'll take you to equal about 9 inches of cinnamon lined up end to end, like you were measuring the distance to the moon or the circumference of the Earth or whatever those meaningless statistics Fig Newtons and whomever use to tell you just how many Fig Newtons or whatever are sold each year
  • 10 whole cloves
  • 10 black peppercorns
  • 1 teaspoon allspice berries
  • 2 bottles medium- or full-bodied red wine (e.g., shiraz, pinot noir, zinfandel, cabernet sauvignon, oh my God, whatever, etc.)
  • 4 healthy strips of orange zest
  • 1/4 cup sugar
  • brandy
First up, toast the cinnamon sticks, cloves, peppercorns, and allspice in a heavy-bottomed, non-reactive saucepan (i.e., dutch oven) over medium-high heat until it all starts smelling like a GLAH-DAY candle. This should take about 2 minutes.


Add your wine, orange zest, and sugar. Stir the pot up every once in a while to dissolve the sugar as you bring this up to a simmer.


Then, partially cover the pot, reduce the heat to low, and simmer for an hour until the wine is infused. DO NOT LET IT BOIL. (I don't know why, I just know that if you let this boil it gets all harsh and brassy and I guess that's why you shouldn't let this boil. Go figure.)

After an hour, give it a taste; it should be a little sweet and a little spicy and not overly... anything. It's hard to explain. But if you'd like it a little sweeter add a very little bit of sugar at a time, but not before...


you add some brandy! See, you pretty much cook out most of the alcohol as you're mulling your wine, and one of the homiest bestest parts of drinking mulled wine is the warm homeyness that spreads through your chest with each sip. (Seriously, this is like the best anti-depressant IN THE WORLD.)

So add a glug or two of brandy to your mug and then ladle in some hot, steaming mulled wine and take a sip.


And then put on some Christmas music and prepare to be transported to your own personal winter wonderland. (Or add a little more sugar as is your wont. But I don't advise it (says the girl who hates fruity drinks).)

(By the way, this is supposed to serve 8. But we're alcoholics so we drank up the whole pot last night while catching up with all the crap television on our DVR. Hence tonight's whiskey.)

Cheers!

10.11.09

About Roasted Brussels Sprouts with Bacon

Tam asked for variations and I aim to please, but I'm not sure if she keeps kosher or not so if she does then OOPS. I guess you can omit the bacon if you want but OH MY GOD WHY WOULD YOU WANT? Except for that whole "God" thing I guess. Whatever.

So yeah. Another way I make the Brussels sprouts. And just in time for your Thanksgiving feast! Although you might need to double the recipe or something depending on how many people you're having over. Me? Just my mother and my sister and my boyfriend and my cat. But I'm not making this anyway, because I think we're doing Vietnamese for Thanksgiving on account of my mother and my sister coming to visit, and anyway this wouldn't be enough unless I doubled the recipe because this feeds two:
  • 1 lb. Brussels sprouts, trimmed and halved
  • 2 slices of bacon, sliced into 1/4-inch slivers
  • 1 small shallot, sliced
  • 1-2 garlic cloves, minced
  • 1/2 tbsp. extra virgin olive oil
  • 1/4 cup water or broth
  • Squidge of lemon
Preheat your oven to 450 F, then toss the first five ingredients together with some salt and pepper and spread it all out in a single layer in a large skillet or baking dish.


Roast all that in the upper third of your oven, stirring once after about ten minutes. Give it another ten to fifteen minutes more, until your sprouts are tender and browned at the edges.

Pull the pan out of the oven and stir in your water or broth, making sure so scrape up any brown bits from the bottom of the pan (brown bits = flavor!). Add your squidge of lemon and serve.


(Also, enjoy!)

About David's Cousin's Corn Pudding

Hey there, remember me? I'm the girl who used to cook and then take pictures of what she was cooking and then write about those pictures of what she was cooking and then post that writing about those pictures of what she was cooking right in this very web space. Well, FUNNY STORY. Actually, it's not funny so much as it is ANNOYING, because this camera I've been using? The one being held together by rubber bands? Well it's not so hot, actually. Actually, it kind of sucks. I sucks so bad in fact that I haven't really been able to get any decent shots off of what I've been cooking so that I could write about those shots of what I've been cooking and post that writing about those shots of what I've been cooking right in this very web space.

Also, I haven't really been cooking that much.

HOWEVER, I did cook on Sunday night and this is what I cooked, my BFF's cousin's corn pudding, a recipe Paula Deen would be so very proud of (you'll see why), a recipe that would be perfect for your Thanksgiving feast. Because it's delicious. And easy. TWSS.

So here's what you'll need:
  • 1 can of corn, drained
  • 1 can of creamed corn
  • 1 stick of melted butter
  • 8 oz. of sour cream
  • 1 box of Jiffy corn mix
Mix all that together in a casserole dish. (Mine's vintage Pyrex found in etrets's etsy shop.)


Bake that in a preheated 325-degree oven for an hour to an hour and fifteen minutes. (It should still be goopy and jiggly in the middle.)


And then dish it out onto dishes and serve!


(Insider's tip: this goes really well with a bowl of chili.)

Bonus!

There's lots of stuff you can add to this basic recipe, stuff like minced chives and jalapenos and shredded cheese and pretty much anything you can think of that goes good with cornbread. So don't forget to do that! You know, if you want to. Whatever.

Double Bonus!

Here's a picture of Schilbo getting ready to put some in the oven!

30.9.09

About Brussels Sprouts

Le sprouts from Brussels get a bad rap. When overcooked, le sprouts from Brussels release a chemical compound called sinigrin, adding a certain pungent and sulfuric aroma that is just about as gross as it sounds. So if you like cabbage, but hate le sprouts from Brussels, chances are whoever it was who cooked them for you was a shit-ass-motherfucking bad cook. It's not mean if it's true.

I have about a billion yummy brussels spouts recipes, but this one is by far the most basic and a good introduction for you, the future brussles sprouts lover. Here's your shopping list, and an apology in advance for the crappy picture quality (someone stole my camera when I was in New Orleans, and this one is currently being held together by a rubber band):
  • 1 pound fresh brussels sprouts
  • 2 tablespoon butter
  • Salt and pepper to taste
  • 1 teaspoon fresh lemon juice
First you need to trim your sprouts. Do this with your paring knife by cutting off any excess stem at the base of your sprout, and removing any loose leaves around the bulb. Now boil the spouts in salted water for 3-4 minutes until just tender. (Just stab a sprout with a fork to judge tenderness. Incidentally, this method also works on boys.)


Strain these in a colander and immediately dump them in a bowl of ice water to keep the color bright green and stop the cooking process. (This is called blanching, for those of you keeping score.)


Once they have cooled, cut your spouts into halves.

Melt the butter in a wide sauté pan over medium-high heat. Add the brussels sprout halves and a pinch or two of salt and pepper.


Cook your spouts for several minutes, tossing occasionally until they have started to brown and have finished cooking through. Whatever you do, DO NOT OVERCOOK THEM, because remember that thing I said about sinigrin? Yeah, so if you do decide to overcook them, your sprouts will be bitter. Don't say I didn't warn you.

Remove the pan from the heat and add the lemon juice, tossing to coat. Add some more salt and pepper if you need it.

Now stick them on a plate and prepare to fall in love with your next vegetable. I SAID PREPARE, GODDAMNIT! Ahem.

25.9.09

About My Boyfriend's Mother's Kugel

Today is my boyfriend's 47th birthday, and in honor of this milestone I thought I would share his mother's kugel recipe, which isn't as good as his grandmother's stuffed cabbage recipe, and definitely not as good as my mother's latke recipe, but I'm not terribly convinced I even like kugel all that much. I mean it's fine, whatever, but I'm not super in love with it or anything, because, I don't know. It's like this mutant side dish/dessert thing that really fucks with my mind, you know? But if you are the kind of person who enjoys a good mind fuck every now and again, I am assured that you'll absolutely LOVE this. So here goes:
  • 1 lb. wide egg noodles

(See?)
  • 16 oz. sour cream
  • 16 oz. cottage cheese
  • 5 eggs
  • 2 tsp. baking powder
  • 1/2-3/4 cup sugar (I like half a cup, Seth likes three-quarters; it all depends on how sweet you'd like your kugel to be)
  • 1 tsp. salt
  • 2 tbsp. butter melted into a 9x13 baking dish
  • 1/2 cup raisins (optional)
  • Cinnamon and brown sugar for sprinkling
Preheat the oven to 350F degrees.

Boil the noodles for 4 minutes, which won't cook them all the way through but this is a good thing! Don't worry about it! And then drain them in a colander.


Meanwhile, in a large bowl, beat your eggs well, and then mix in the sour cream, cottage cheese, baking powder, sugar, salt, and optional raisins. (I actually meant to add raisins, but I forgot. Oops.)


And now add the noodles. Stir it good. St-stir it real good.


Pour this mixture into your buttered 9x13 baking dish, sprinkle the top with cinnamon and brown sugar, and then bake that bad boy (or girl, whatever) for 30-45 minutes, until the top is brown and crunchy and the kugel is just set.


Let that sit for another 15-20 minutes or so, and then slice and serve.


Now, there will be a lot of this left over. Like, a whole lot. But don't worry about it! Leftovers can be wrapped and frozen so you can have kugel whenever you want. You know, if you want. Whatever.

Happy 47th birthday, boyfriend!

3.9.09

About Sauteed Tilapia

A lot of you know me pretty well by now, so it should come as no surprise that I trend towards the complex. I'm way too thinky and I live inside my own head way too much and I generally just make a mess out of things. Why I am like this I do not know, but there is certainly never a dull moment around these parts.

THAT SAID, sometimes simple is best. And this recipe is most definitely simple. Short-bus simple, even. And super healthy to boot. What we're booting I have no idea, so let's just say we're booting claustrophobia.

Yeah, I don't know either.

All you'll need is:
  • 2 fillets of tilapia (or any other fish, really)
  • The spice mixture of your choice (or any combination of spices, really)
  • A little extra virgin olive oil
  • A non-stick pan
  • A couple lemon wedges
First up, sprinkle your seasonings on both sides of your fish. This night I happened to use some Tony Chachere's, but there's also this Bayou Blackening Spice a company out of Virginia makes, and I'm not sure if you can get it everywhere but if you can, do it because IT IS AWESOME.


Next up, heat just a little bit of oil in your pan over medium-high heat. Once you're hot enough (but really, when are you not?), add in your fillets.


Now here's a fun fact about cooking fish, although I suppose "fun" is probably not a very good word to use in this situation, because it's not "fun" like reading or drinking or Wii, so whatever, fill in your own adjective I guess. Wait, where was I?

OH YEAH.

Fun fact: you cook your fish way more on one side than you do the other. We saw this once before with some salmon fillets, and the same goes here, only since these fillets are so thin it'll take far less total cooking time. And how long is this cooking time? About 3 minutes on your first side, and 1 minute on your flip side.

Aaaaaand you're ready for the plate.


Add a squidge of lemon and you've got yourself a simple, healthy, delicious dinner.

About Toasted Israeli Couscous with Zucchini

Alex and I used to wander into the UC at Tulane University round about lunch time and every now and again we'd hit the jackpot: Greek Salad Day. Greek Salad Day was the best day of all the days because (a) the Greek salads were ridiculously awesome, and (2) South Park.

Do what now?

Alex and I used to wander around Tulane University quoting Eric Cartmen INORDINATELY, particularly the classic line, "YEAH I WANT CHEESY POOFS!", because yeah, I would like some cheesy poofs, please. And so one fateful day Alex and I were waiting patiently in line, side by side in the UC at Tulane University, watching our ridiculously awesome Greek salads being constructed. And I don't remember which of us said it, but I do remember that the nice lady behind the counter was certainly not expecting her innocent query, "Would you like some couscous?" to be answered with "YEAH I WANT COUSCOUS!" Because yeah, we would like some couscous, please.

This is not that kind of couscous. My boyfriend does not like that kind of couscous. And I don't know, maybe it's because he's Jewish or something, but the only couscous he likes is Israeli couscous, even though he only had Israeli couscous for the first time, like, three months ago.

What is Israeli couscous? Why, it's a unique Mediterranean toasted pasta specialty. Don't believe me? Fine, see for yourself:


Israeli couscous is also ridiculously awesome, because really it's just pasta, but it's tender and chewy and completely unlike pasta. Plus you can add all kinds of things to it, like zucchini for instance! So for four servings, you'll need:
  • 1 large zucchini, cut into small cubes
  • 1 cup Israeli couscous
  • 1 1/4 cups chicken broth
  • 1 small onion, diced
  • 2 medium garlic cloves, minced
  • Olive oil, salt, and pepper
  • 2 tablespoons of assorted fresh herbs, minced
Once you have your mis en place all placed,


heat up a tablespoon or so of extra virgin olive oil in a medium saucepan over medium-high heat until it gets all shimmery and starts to smoke. Then add your zucchini (or summer squash or bell pepper or eggplant or heck, all of the above), a pinch of salt, some freshly cracked black pepper, and a couple shakes of any other seasonings you like (like cumin or coriander or paprika or heck, all of the above). Then saute that down until your zucchini has lost a lot of its liquid and is starting to brown all up. Sort of like it went to the beach and got a suntan. Only not like that at all. Shut up, Kat.

(This should only take a couple minutes.)


Dump all that zucchini onto a plate.

Return your pan to the heat and maybe add a drop or two of oil if you think you need it, then dump in your onions with another pinch of salt and some freshly cracked black pepper, and saute that until it is softened and starting to brown, not AT ALL like it went to the beach and got a suntan.

(This should only take a few minutes.)


Next up, add in your garlic and your couscous, and toast that all up for about a minute.


Oh yeah, stick your chicken broth in the microwave for a minute or two until it boils. Then pour it into the pan and stir everything up, making sure you scrape up any fond from the bottom of the pan.

Turn your heat down to low and slap a lid on that baby, and let it simmer away for about 10 minutes, stirring occasionally. Your couscous should absorb pretty much all of the liquid, making it slightly chewy but not hard.


Return your sauteed zucchini to the pan and dump in your herbs.


Give it healthy stir to incorporate all of your ingredients, put the lid back on your pan, and let that heat back up for a minute or two more. And just like that (well, not JUST like that, but close enough), you are ready to serve.


(Oh, and I find a squidge of lemon over everything really brightens things up, kind of like going to the beach and . . . oh, never mind.)