30.4.09

About Asparagus Ravioli

When the Caps have a matinee game, like they do this weekend (LET'S GO CAPS!), a curious thing happens. We'll wander out of the Phone Booth, drunk and exuberant from the latest stunning Caps win (LET'S GO CAPS!), and it will still be light outside. And stores will still be open and shit. And so we'll wander around the neighborhood, hooting and hollering, until invariably we'll end up at the cheese shop because I LOVE CHEESE. And then we'll wander around bar hopping until bedtime and wake up Sunday morning and wonder where the $10 bottle of tomato sauce came from.


Oh yeah, the cheese shop.

So we'll have this $10 bottle of tomato sauce, and we don't want to just waste it on some crappy spaghetti or whatnot and we'll sort of babble about pasta or whatever until the phrase "well method" pops up and then somehow I'll get roped into making ravioli from scratch because asparagus is on sale and also we have a huge hunk of goat cheese in the fridge and asparagus and goat cheese SCREAM ravioli. (Also, tart and frittata and omelet and quiche and LET'S GO CAPS!)

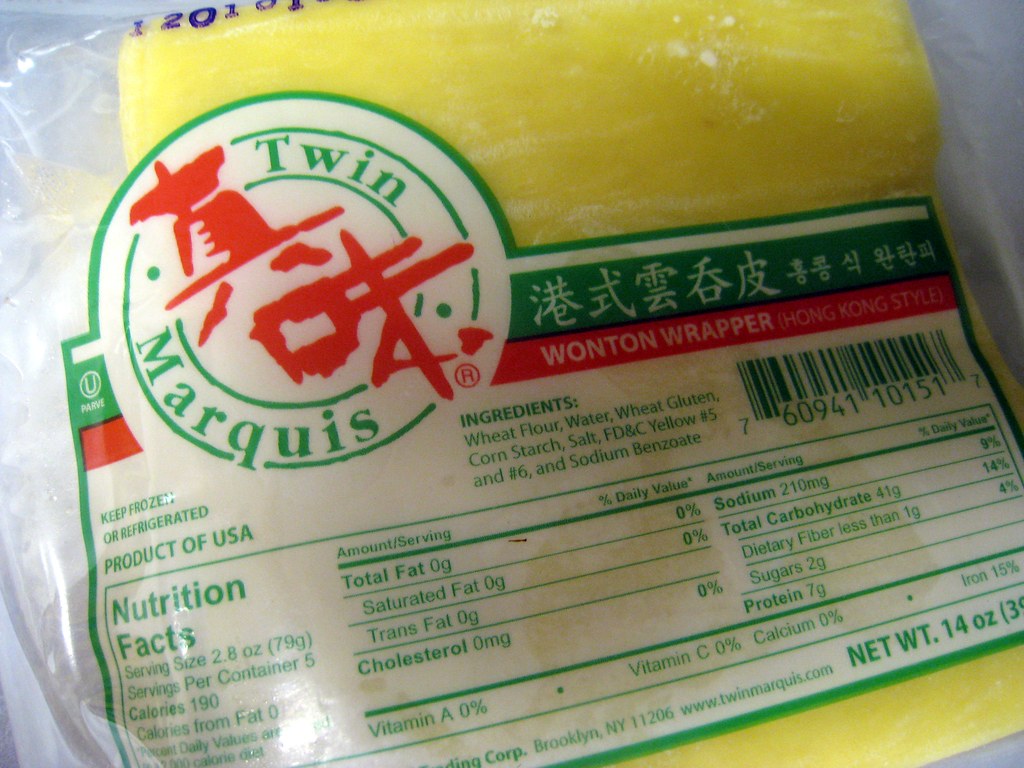
But then I'll remember that our cleaning service doesn't come for two weeks and the well method of pasta making looks REALLY messy and also I have a cat who likes to stick his face in everything and hey! I'm Asian! And I live in Chinatown! Which leads to me buying a package of wonton wrappers and morphing into a cynical, embittered version of Sandra Lee, whom I hate by the way.

And so, to make me feel better about buying these (which you can get in your local supermarket, by the way, usually in the produce section where they keep all the tofu and phoney baloney and whatnot):


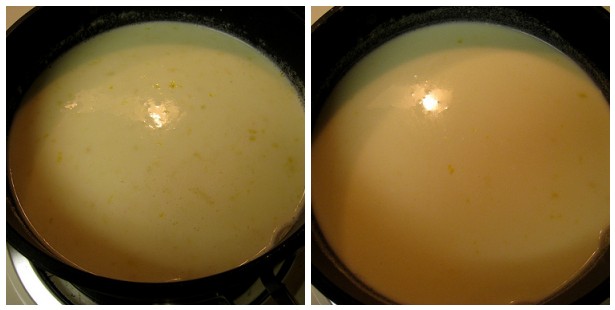
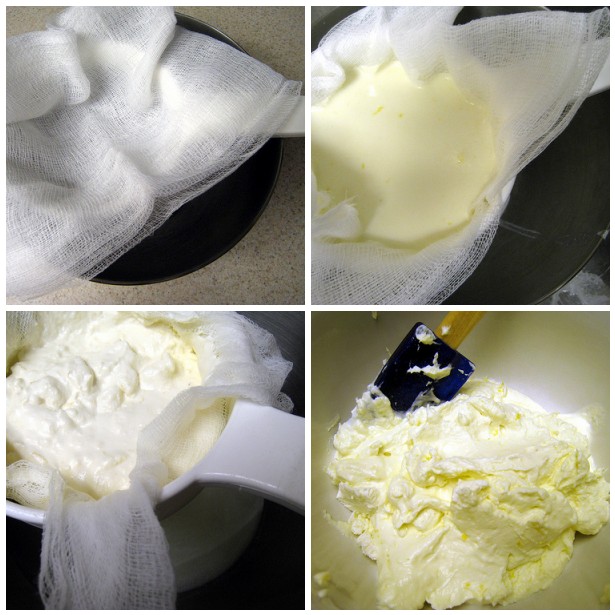
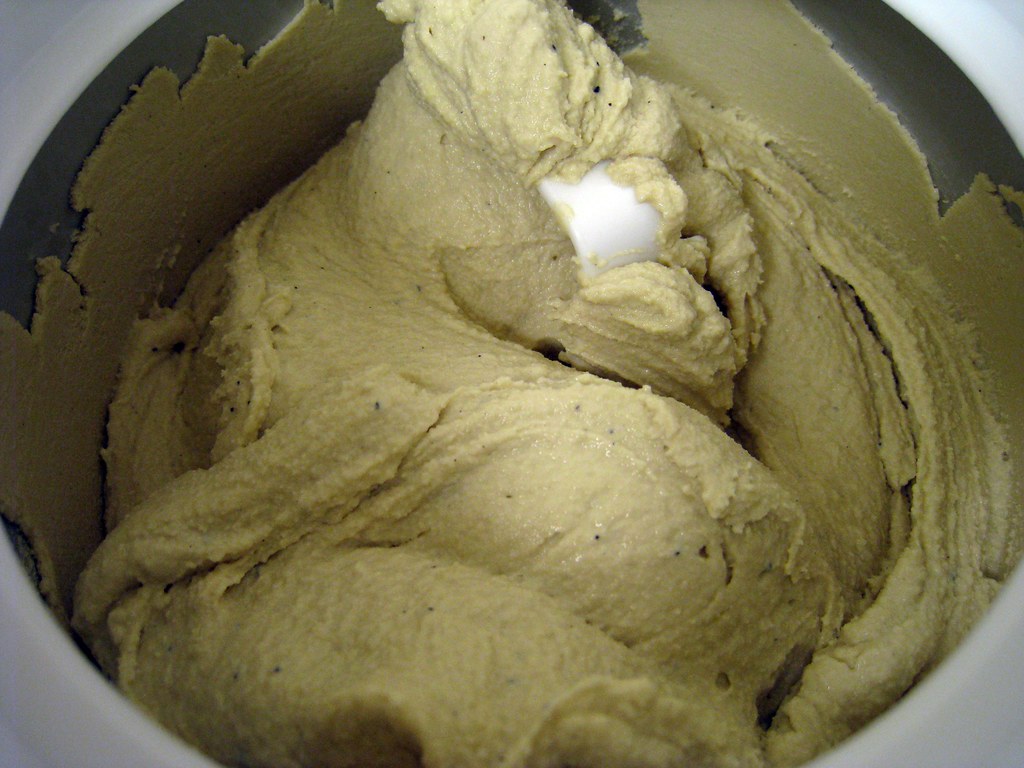
I'll spend the day making my own ricotta. So SUCK IT SANDRA LEE.

Your grocery list, for about 35 raviolis:
  • 3/4 cup ricotta cheese, well drained
  • 6 ounces softened goat cheese
  • 1 cup steamed asparagus, chopped
  • 1 egg
  • Salt and pepper to taste
  • Package of wonton wrappers
  • 1 egg white
So yeah, first you're gonna wanna steam (or roast or boil or whatever) your asparagus until it's cooked, then you're gonna wanna let that cool, AND THEN! cut off the tips (and save them for later), and chop up all the stems into little pieces.


Then you're gonna take your ricotta, goat cheese, and chopped asparagus, and you're gonna dump it all into a bowl, and mix it up, and taste it. Need salt? Add salt. Need pepper? Add pepper. And then add your egg and mix it all up again.


Then, put your filling mixture (because I don't know if you caught what was going on here, but that's what you just made) in the fridge to chillax for a few minutes. THEN then, pour yourself a glass of wine, because you have a bit of work ahead of you.


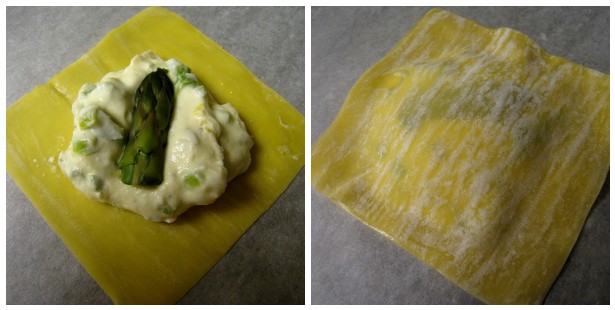
Man, I could totally use a glass of that wine right about now. Anyway. Clear yourself a little counter space and set up a little work station: have your package of wontons open and your egg white in a little bowl and a place to put all of your finished raviolis. And those asparagus tips you saved? Slice them all in half lengthwise. And prepare to make magic.

Take out one wonton wrapper and place a little dollop of filling right in the middle. (Little dollop = NOT TOO MUCH! You don't want the damn things exploding on you!) And in the middle of that place one of your sliced asparagus tips. FANCY. Dip your finger in the egg white, and dab it along the edges of the wonton, around the filling. (This is the glue that keeps the two wrappers together.) Then, place another wrapper on top, and carefully press the two sides together, making sure you get as much air out as possible.


Lather, rinse, and repeat. And before you know it, look how many raviolis you've made!


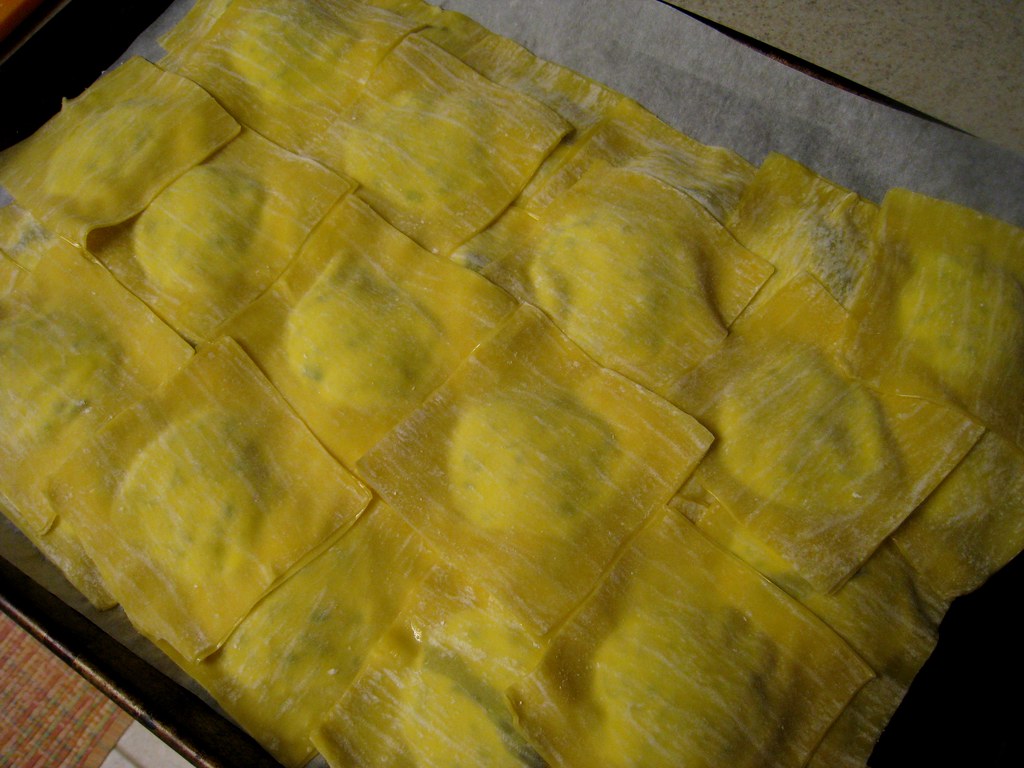
Now stop being so smug and put those in the fridge while you heat up some sauce and boil some water. Go ahead, I'll wait. Done? Okay, good. Gently boil your raviolis for a minute. MAYBE two, but I'm skeptical. Then remove them to your serving dish with a slotted spoon (five to six raviolis should be enough for one person; you can freeze the rest for later).


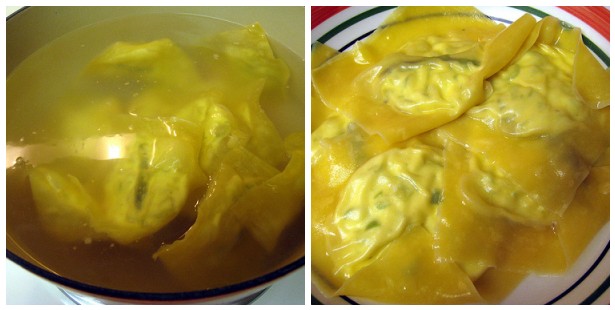
Sauce those bad boys up, and while you're at it, top it off with some fresh basil and Parmesan.


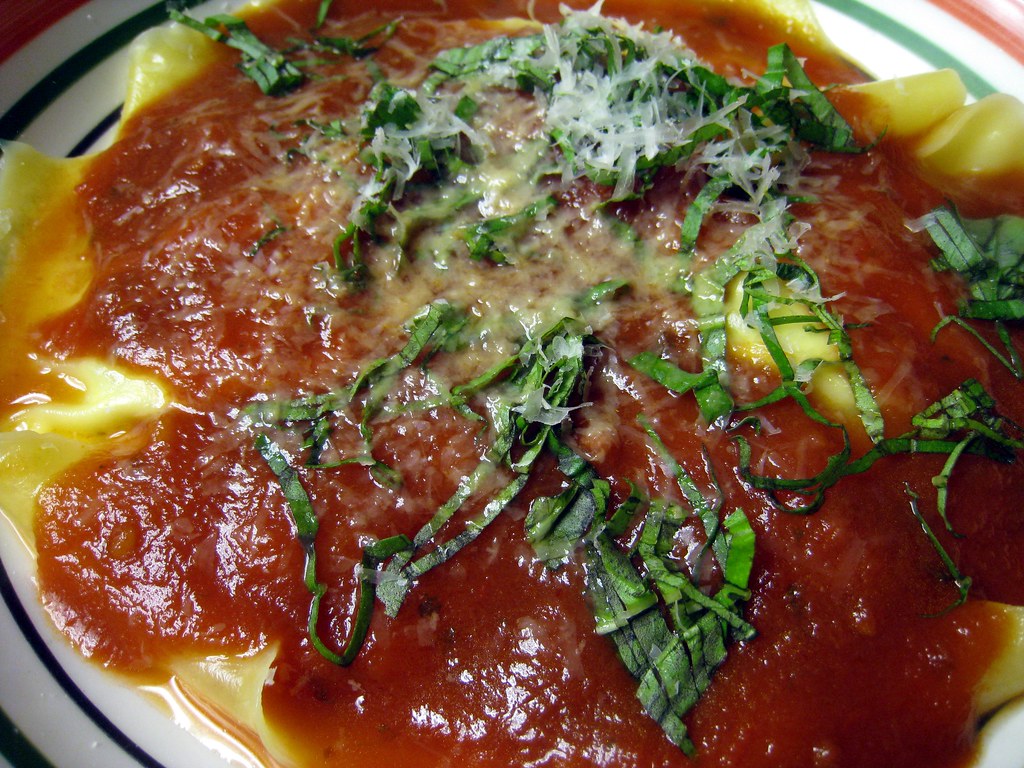
VOY-LA. A romantical dinner for two, semi-homemade with love.

Gah, I can't believe I just said that. Someone please shoot me in the face. Also, LET'S GO CAPS!

About Ricotta

I have a rather surprising confession to make, and that is this: I love cheese. I love cheese SO MUCH. I love cheese SO MUCH that every now and again I am overcome with this overwhelming desire--nay, need--to wield my God-like powers and CREATE THE OBJECT I SO DESIRE.

Ahem. Sorry about that; I think my love of cheese momentarily took over my brain like some sort of brain-taker-over thingy. ANYWAY, here's the thing: making ricotta is ridiculously easy. So let's go shopping, 'kay?

For about a cup of cheese you'll need:
  • 1 quart whole milk
  • 1 cup heavy cream
  • 4 lemons
  • 1/2 teaspoon salt
  • 1/2 teaspoon sugar
So listen, you might not have a Microplane grater in your kitchen, and to that I say WHY NOT? Just look what a good job it does at zesting lemons!


Because that's what you'll need to do first: remove the zest from all your lemons and then juice them. (If you don't have a Microplane, don't fret! You can use either a vegetable peeler or the finest side of a box grater. Just make sure you only remove the outer yellow part, and none of the pithy white stuff beneath.)

Now that the hard work is done, go ahead and heat up your milk and cream. Once it comes to a boil immediately remove it from burner. Add the rest of your ingredients, stir it all together, and let it sit for 20 minutes. It'll go from this to this:


Fascinating, I know. Seriously, though, this is where it gets interesting. Remember that fine-mesh sieve of yours? Well, set that over a bowl and line it with a couple layers of cheesecloth. (Get it? Cheesecloth?) Then pour everything in that pot through that cheesecloth (get it?) and let it strain for at least two hours, until it's about as thick (heh) as you need it to be.


Then, when you dump it all out into a bowl, you can pat yourself on the back because YOU JUST MADE CHEESE.

One final note: this particular ricotta recipe is very, very lemony, which means it's best suited for desserts, or for foods that play well with lemons. So if you want a more Jack-of-all-trades cheese, omit the zest and only use the juice of 2 or 3 lemons.

Happy cheesemaking!

22.4.09

About Pan-Roasted Salmon Fillets

One of the things that I have the hardest time cooking is fish. And I LOVE fish. Like, SO MUCH. But the problem with fish is that it needs to be fresh, and the problem with fresh fish is that you need a place to actually buy said fresh fish, and the problem with me is that I didn't have a place to actually buy said fresh fish until this past September, when AFTER FIVE FUCKING YEARS OF LIVING HERE my neighborhood finally got a grocery store. Ahem.

So anywho, you know how you'll go to a restaurant and order the sea bass or whatever (don't order the sea bass! They're overfished! Try the skate wing instead!) and it'll be simple and perfectly cooked and absolutely TO DIE FOR? Well that's what I've been working on for the last couple of months and finally nailed over the weekend. And guess what? It's pretty damn simple. Who woulda thunk?

You'll need:
  • 2 salmon fillets, skin on and scaled (you know, how you buy them in the supermarket. Incidentally, this will work with just about any firm-fleshed fish fillet. Also, GIVE ME BACK MY FILET O' FISH!)
  • 2 tablespoons olive oil
  • Salt and pepper
Pat the fillets dry (so they won't splatter when they hit the hot oil) and generously salt and pepper both sides.


Heat a large skillet over medium-high heat until water droplets spittle and evaporate immediately. Then add the oil and heat until shimmery. Place the fish skin side down in the pan, and cook for 5 minutes.


Flip the salmon and cook for another minute.


Then remove the fillets to a plate.


Then, I don't know, serve with a yogurt sauce and some sauteed mushrooms. You know, whatever.


The end.

About Sauteed Mushrooms

Some things are meant to be eaten at room temperature; food that's either too hot or too cold just isn't as flavorful. Don't believe me? Then burn your tongue on some piping hot soup. Or try to drink an entire bowl full of melted ice cream. See? I was right. (Standard.) So let's try a little room-temperature recipe that will BLOW YOUR TASTE BUDS OFF.

Shopping list!
  • 3 tablespoons of extra virgin olive oil
  • About 1 pound of mushrooms, cleaned, trimmed, and sliced (here I used half criminis and half shitakes)
  • Salt and pepper to taste
  • 1 teaspoon minced garlic, from about 2 cloves
  • 1/4 cup dry white wine
  • 2 tablespoons freshly chopped parsley leaves (I also threw in a bunch of fresh tarragon)


First off, pour yourself a glass of that there wine. Gotta make sure it's not poisoned, right?


Next off, heat the olive oil in a skillet over medium heat. When that's all hot and bothered, add the mushrooms and sprinkle with some salt and pepper. Saute those down, stirring occasionally, until they're all browned and tender. This should take about 10-12 minutes.


Add the garlic and stir it around until you can start to smell it, which will take no longer than a minute. Then add the wine (Oh! My favorite!) and let it bubble away for about a minute more.


Turn the heat to low and add your herbs; let that heat up for another minute, then turn off the stove and let it all sit for anywhere up to an hour before serving. Easy, peasy, one-two-threesy.


(Seriously; this was so good I made it two days in a row.)

About a Yogurt Sauce

Let's talk ridiculously easy, shall we? Like, so ridiculously easy that I actually made up this entire recipe ALL BY MYSELF, and its ingredients are so interchangeable it might as well not even be a recipe at all. IN FACT, it doesn't even need to be a sauce! By leaving out the olive oil (we'll get to that) I've actually served this as a dip. And leftovers? Make a great substitute for mayo in your potato salad! Or your tuna salad! Or your chicken salad! Or your . . . well, you get the idea.

This recipe is ridiculously easy, yes, but because of its ridiculous easiness it's important that we spend a couple minutes talking about ingredients. And the main ingredient is yogurt. Generally I use a plain Greek yogurt, because if you've never had Greek yogurt before man, do I feel sorry for you. It's thick (heh) and creamy (heh) and tangy (heh) and delicious. But if you don't have Greek yogurt in middle America do not fret, or rather, do fret, because you have some work ahead of you.

Recipe Within a Recipe: How to Fake Greek Yogurt

It's pretty easy, actually. Just set that fine mesh strainer of yours over a bowl, line it with a couple layers of cheesecloth, and dump a tub of plain yogurt in there. Cover it up with plastic wrap (fats absorb odors like you wouldn't believe, so if you don't cover your yogurt it will end up tasting vaguely like just about everything in your fridge; this is also the number one reason why you should store your extra sticks of butter in the freezer) and put the whole thing in the fridge overnight. Next day you'll see that the bowl is full of whey (which you don't need) and that your yogurt is thick (heh) and creamy (heh) and tangy (heh) and delicious.


The other main ingredient is herbs. Now, I don't care which herbs you use because in this recipe I've used just about every herb known to humankind (lies). But since there is no actual cooking going on whatsoever, you really, really, REALLY MUST use fresh herbs. I'll even give you some suggestions: tarragon goes great with beef, mint is a natural with lamb, dill plays well with fish, chives are awesome with potatoes, AND SO ON AND SO FORTH.

Let's go shopping.
  • 1 small container of plain Greek yogurt
  • 2 tablespoons of shallots, minced finely
  • 3-4 tablespoons of chopped fresh herbs (here I used dill)
  • A squeeze of lemon juice
  • A drizzle of olive oil
  • Salt and pepper to taste.


Mix everything up in a bowl, give it a taste, and adjust the seasonings to your liking. Need more lemon? Add more lemon. Not salty enough? Add more salt. Too tangy? Add more olive oil. YOU GET IT.

Cover with plastic wrap and let it sit in the fridge for a bit to let all the flavors flavor each other. When you're ready to serve, remove the plastic wrap, give it another stir, and, um, serve.

18.4.09

About Irish Coffee Ice Cream

We like us some Irish coffee. We like us some Irish coffee A LOT. In fact, now that it's playoff season we'll be spending the majority of our time before games at the pub around the corner, sipping a couple of these:


(1 p.m. games = 10 a.m. Irish coffees.) (Also, LET'S GO CAPS!)

Another thing we like is ice cream. We like ice cream A LOT. In fact, just this last summer Winston (cutest kitten in the whole wide world) bought me an ice cream maker for my birthday so's I could do awesome things like PUT BOOZE IN MY ICE CREAM. Because booze is awesome.

Time to go shopping (for booze).


For about a quart of ice cream you'll need:
  • 3 cups of fat-free half-and-half (usually I use 1 1/2 cups of whole milk and 1 1/2 cups of heavy cream, but I went this route just to see if it would work. And it did.)
  • 3/4 cup sugar
  • 1 1/2 cups whole coffee beans (I meant to use decaf, but the boyfriend brought home the wrong stuff.)
  • Pinch of salt
  • 5 large egg yolks
  • 1/4 teaspoon vanilla extract
  • 2 tablespoons Irish whiskey (any more and your ice cream won't actually freeze. But the resulting Irish coffee milkshakes will be equally delicious. And way boozier. Just not frozen.)
  • 1/4 teaspoon finely ground coffee (you can press regular grinds through a fine mesh sieve, or use espresso grinds. Also, "grinds" is a funny word.)
First, you're gonna wanna pour yourself a glass of that there whiskey. Gotta make sure it's not poisoned, right?


Next, heat up 2 cups of fat-free half-and-half, all of the sugar, the coffee beans, and a pinch of salt in a medium saucepan until everything gets all warm and steamy, but not boiling.


Then, put on yer lid, remove the pot from the heat, and let the whole shebang steep at room temperature for an hour to let all the coffee goodness get good and coffee-y.


Pour the remaining cup of fat-free half-and-half into a large bowl, and set a mesh strainer on top. Set aside. In a separate bowl, whisk the egg yolks together.


Reheat your lidded coffee mixture, now unlidded, on medium heat, until again hot and steamy (heh). When you've gotten all hot and steamy (heh) slowly pour a little of the mixture at a time into the egg yolks, whisking constantly so that the egg yolks are tempered by the warm milk, but not cooked by it. If you pour too fast or whisk not enough, you'll end up scrambling your eggs, which is good for breakfast but not for ice cream (as far as I know).


Now to make a custard! Scrape that all that back into the saucepan, stirring it constantly over medium heat with a silicon spatula, scraping the bottom and sides of the pot as you stir. In about 10 minutes, you'll notice the mixture has thickened considerably. Once it coats the spatula so that you can run your finger across the coating and have it not run, you're done. (With this step, anyway.)


Now pour your custard through the strainer and stir it into the cream. Press down on the coffee beans in the strainer to extract as much of the delicious coffee flavor as possible. (You'll notice that the fine mesh will also catch any pieces of scrambled egg you may have accidentally cooked.) Then you can toss the beans in the garbage. Or better yet, the compost heap! Finally, mix in the vanilla, Jameson, and finely ground coffee, and stir until cooled.


Here's the big secret to making ice cream at home: the colder your base is before you put it in the machine, the better. So wrap up your bowl in plastic wrap and stick it in the fridge at least overnight. Or, as Jack Bauer has taught us, 24 hours is better. Then, fix up your ice cream maker however you're s'posed to fix it up, flip that baby on, and pour your custard in.


And watch the magic happen!


Also, listen to the magic happen!


Magic is loud!

After 20-30 minutes of loud magic, you'll have this!


Which is about the consistency of soft-serve. So you can either eat it right away, or scoop it all into a container and stick it in the freezer for another couple hours. Either way, YUM.

Also, LET'S GO CAPS!

16.4.09

About Kitchen Essentials

I've been asked to dumb it down so dumb it down I will, DUMMIES. (I kid, I kid. And I kid because I lurve.) So over the next few weeks or so I'll be showing you how to, I don't know, dice an onion or boil an egg or whatever, EVEN THOUGH if you weren't so lazy you could watch any of the billion videos on YouTube about the topic RIGHT THIS SECOND. (I lurve.)

So let's start with something easy: a list of somethings each and every one of you should have in your kitchen.


Cutlery. Despite what all the fancy kitchen catalogues would have you believe, all the cutlery one needs is a paring knife, a chef's knife, a bread knife, and a really strong pair of kitchen shears. When shopping for your own set look for something with a little heft and a strong blade; both will give you better control and minimize the accidental chopping off of fingers. You can find really great deals on high-end brands on ebay. For a far more economical option, check out Victorinox's Forschner brand, made by the same folks that bring you Swiss Army knives!


Cutting boards. Now that you have your fancy knives, you're gonna want to get a nice big cutting board. Whether you go wood or high-density plastic in a fabulous color, I really must insist that you keep your fancy knives away from those God-awful glass things the world insists on manufacturing. Seriously, that shit will RUIN your knives. They make some really great bamboo boards now, which have the added benefit of being very eco-friendly. Plus, they look super cool, and I always say if you're gonna buy stuff it might as well look super cool.


Cookware. You're probably gonna want to actually cook things after you've gone through all the trouble chopping shit up, huh? Well your options here are seemingly endless, and I wouldn't even presume to tell you what you should and shouldn't buy. Except that I'm going to. Whatever you do, DO NOT BUY ALUMINUM COOKWARE. Your pots and pans should have gravitas, the kind of strength and fortitude you rely upon when the going gets tough and the tough get going. Which means, NO IKEA. Sorry. Also, beware of plastic handles that aren't oven-safe. Because did you know you use your cookware on both the stove top AND in the oven? Because you do, dummies. Beyond that, the world is your oyster. But might I suggest two things? A really good I-need-to-start-lifting-weights-because-this-thing-is-so-heavy dutch oven (5 1/2 quarts is a good size when cooking for two), and an 8-inch non-stick fry pan for making eggs.


Tools. Let's look at some tools. Heh. Here we have a spatula for flipping, a slotted spoon for draining, tongs for just about everything, a ladle for pouring, a heat-proof silicone spatula for, like, scaping things and stuff, and a wooden spoon for stirring.


More tools. Heh. A manual can opener to SAVE THE EARTH!, a garlic press, a vegetable peeler, a citrus juicer, a whisk, an ice cream scoop, and a steel to hone your fancy knives before each use.


Colanders. Are you bored yet? Because I kinda am. ANYWHO, I have two colanders: a big one for rinsing veggies and draining pasta and whatnot, and a fine-mesh one for straining sauces and custards and stuff.


Finally. A simple set of measuring spoons and a measuring cup, and TWO kinds of thermometers, one for meats in the oven and one for meats on the grill.

This is by no means all the gear that I have in my kitchen, by ANY stretch of the imagination, because for me a kitchen store is just about as dangerous as a bookstore, and MY GOD have you seen how many books I own? I own a lot of books. I do, however, think this is the gear that will get you started, and we all have to start somewhere. Or so I'm told, which is why I wrote all this in the first place.

Finally finally, if anyone has any requests by all means let me know. A long and tedious post where I berate all you dummies is sure to follow! (I lurve.)

13.4.09

About Sweet Potato Fries

Sweet potato fries make a regular appearance on our dinner plates, and it seems as though just about everyone on the internets has an opinion on the matter. There's dooce's simple and straightforward version, and Shari's holy crap that sounds awesome! version, and then there's mine, which is a pretty reasonable cross between the two I'd like to imagine.

(For the record, I like to imagine a lot of things. Like one day finally getting to see Radiohead in concert. Like actually getting all of my work done when I need it done. Like having the power to turn invisible at will and wreaking havoc upon my enemies. Like Mysterygirl! and Brooksie, sitting in a tree.)

The shopping list is pretty easy for this one, kiddos.
  • 2 medium to large sweet potatoes (depending on how hungry you are.)
  • Olive oil (staple alert!)
  • Salt, pepper, and assorted herbs and spices.
Preheat your oven to 400F degrees. While that's a-heatin', peel yer taters, and slice them up into sticks about half an inch thick.


Now throw 'em all in a bowl, douse with a healthy glug or two of olive oil, and dump in your seasonings (last night I used fresh parsley and *GASP!* dried thyme, but you could use cumin, chili powder, tarragon, savory, rosemary . . . pretty much whatever apparently).


Get your hands in there and mix everything about until well and evenly coated. I suppose you could use tongs or a big spoon or something, but that would be BORING. Then lay all of your furture fries on a baking sheet, making sure not to overcrowd the pan lest they steam instead of crisp, and pop them in the oven.


After 20 minutes, give them a flip and then bake for another 15-20 minutes, until they're as brown and delicious as you like. (We like them on the blackened and caramelized side, but then again, we were never afraid of a little char.)


Once that's done you can either eat them as is, or scoop them all up in a little pile and douse them with honey. Or maybe try one of Shari's dipping sauces. Or WHATEVER JUST EAT THEM ALREADY THEY'RE DELICIOUS.

12.4.09

About My Kitchen

Since we'll be spending so much time together here, let's take a tour, hmm?


This is my cozy little kitchen, spacious enough to fit one human and one cat comfortably. Unfortunately, it's generally occupied by one small human, one giant human, and one cat at all times, which leads to quite a few stomped-on toes and tails.


These are my knives. I use them to cut things, and on occasion, fingers.


This is my ice cream maker. Winston (cutest kitten in the whole wide world) gave it to my for my last birthday. Also, these are our vitamins. We keep them on the counter so we remember to take them with meals, and of course we always forget.


More gear: The Greatest Blender Ever, an adorable miniature food processor, and fruit! That matches my walls!


The Swedish Chef is the patron saint of my kitchen. Which probably explains why there are soup stains on the ceiling.


And this is the most ancient toaster oven in history. It used to not work, but now it miraculously does. Good story, Kat.


Last but not least, Fitzgerald! On my refrigerator!

So there you have it. There's plenty of beer in the fridge; make yourselves at home, won't you?